Maytag Gemini Double Oven User Manual: Comprehensive Guide (Updated 12/22/2025)
Updated December 22, 2025, this manual details the Maytag Gemini MET8720DS, addressing inconsistent performance and limited advanced features for optimal use.
Welcome to the Maytag Gemini Double Oven experience! This user manual is designed to guide you through the features and operation of your MET8720DS model, updated as of December 22, 2025. The Gemini offers the convenience of two ovens in a single appliance, potentially streamlining your cooking process.
However, it’s important to acknowledge that this model, while offering dual-oven capacity, has been noted for inconsistent performance and a relative lack of cutting-edge features compared to some competitors. This manual will help you maximize its capabilities and troubleshoot potential issues. We’ll cover everything from basic operation to specialized functions, ensuring you get the most out of your Maytag Gemini.
Model Numbers & Variations
This manual primarily focuses on the Maytag Gemini MET8720DS double oven model. While Maytag offers various double oven configurations, the MET8720DS represents a common iteration with specific characteristics detailed herein. Variations within the Gemini line may exist, primarily concerning cosmetic finishes (stainless steel, black stainless steel, white) and potentially minor control panel adjustments.

However, core functionality – the dual oven system and associated baking/broiling features – remains consistent across most Gemini models. Always verify your specific model number (located on the appliance’s frame near the oven door) to ensure compatibility with any supplemental documentation or support resources.
Safety Precautions & Warnings
Important: Before operating your Maytag Gemini double oven, carefully review these safety guidelines. Improper installation or use could result in fire, electrical shock, or personal injury. Ensure the oven is properly grounded and adheres to local electrical codes. Never modify the appliance or attempt repairs yourself; contact a qualified technician;
Exercise caution when the oven is in operation or immediately after, as surfaces become extremely hot. Keep flammable materials away from the oven. Supervise children closely when the appliance is in use. Disconnect power before cleaning or performing maintenance.
Important Safety Instructions
Read all instructions before use. To reduce the risk of fire, electrical shock, or injury to persons, observe the following: Use only as a kitchen appliance. Do not operate the oven if the power cord or plug is damaged. Avoid using extension cords.
Never leave the oven unattended during operation. Hot surfaces can cause burns – use oven mitts or pot holders. Do not store flammable materials in the oven. Ensure proper ventilation during self-clean cycles. Always disconnect power before cleaning or servicing.
Electrical Connection Requirements
Proper electrical connection is crucial for safe operation. This oven requires a dedicated 120V, 60Hz, 20-amp electrical circuit. Do not share this circuit with other appliances. A three-prong grounded outlet is mandatory; never remove the grounding prong.
Installation must comply with local electrical codes. If a suitable outlet isn’t available, consult a qualified electrician. Avoid using extension cords or adapters. Ensure the circuit breaker is easily accessible. Improper wiring can lead to fire or electrical shock. Verify voltage before use.

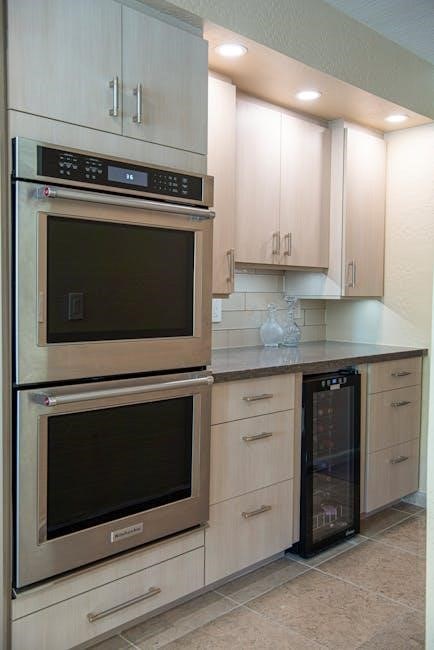
Oven Control Panel Overview
The Maytag Gemini’s control panel manages both upper and lower oven functions. It features a digital display showcasing temperature, cooking time, and selected settings. Control knobs allow for precise temperature adjustments and function selection. Electronic touch controls provide access to specialized features like delay start and self-clean.
The panel clearly indicates oven status – preheating, cooking, or cooling. Indicator lights signal active functions. Familiarize yourself with each button and knob for efficient operation. Refer to subsequent sections for detailed explanations of each control’s purpose.
Display Features & Indicators
The Maytag Gemini’s digital display is central to oven operation. It prominently shows the set temperature for both the upper and lower ovens, alongside remaining cook time. Active cooking modes – Bake, Broil, Convection – are clearly indicated. Preheating is signaled by a flashing indicator, transitioning to a steady display upon reaching temperature.
Error codes, if any, appear on the display, prompting troubleshooting (see section 8). Timer settings are also visible. Brightness is adjustable for optimal viewing. Understanding these indicators ensures informed control and monitoring of your cooking process.
Control Knob Functions
The Maytag Gemini utilizes a central control knob for primary oven selection and adjustments. Rotating the knob cycles through oven choices – Upper, Lower, or Both – displayed on the digital screen. Pushing the knob inwards confirms selections. Turning it adjusts temperature and time settings, with changes reflected immediately on the display.
The knob’s responsiveness is key to precise control. A slight click confirms each incremental adjustment. Familiarizing yourself with this intuitive system streamlines operation, allowing for quick and accurate setting modifications during cooking. Refer to the display for confirmation of all changes.
Electronic Touch Controls
Complementing the control knob, the Maytag Gemini features responsive electronic touch controls. These buttons activate specialized functions like Delay Start, Timer, and Self-Clean. A gentle touch is all that’s needed; prolonged pressing isn’t required. The illuminated icons clearly indicate selected features.

The touch controls offer a streamlined interface for accessing advanced settings. The display provides immediate feedback, confirming each selection. Should a malfunction occur, the display will indicate the issue. Regularly cleaning the control panel ensures optimal responsiveness and longevity of these essential features.
Using the Upper Oven
The upper oven in your Maytag Gemini is designed for everyday cooking tasks. It’s ideal for baking, broiling, and smaller meals. Ensure the oven rack is positioned correctly before starting. Utilize the Baking Functions & Temperature Settings for precise results, adjusting based on recipe requirements.
For quicker cooking or browning, employ the Broiling function, remembering to keep the oven door slightly ajar. The Self-Cleaning Mode (Upper Oven) offers a convenient way to maintain cleanliness, though proper preparation is crucial. Always refer to the detailed instructions within this manual for optimal performance.
Baking Functions & Temperature Settings
The Maytag Gemini upper oven offers several baking functions, including standard bake, convection bake (if equipped), and potentially temperature probe options. Accurate temperature selection is vital; consult your recipe and utilize the control panel’s precise settings. Preheating is recommended for consistent results, indicated by the oven’s readiness signal.
Experiment with temperature adjustments for optimal baking. Lower temperatures are suitable for delicate items, while higher temperatures accelerate cooking. Remember that inconsistent performance has been noted, so monitoring is key. Always use oven-safe cookware and follow recommended rack positions.
Broiling in the Upper Oven
The Maytag Gemini’s upper oven facilitates broiling, ideal for quickly browning or finishing dishes. Position the oven rack appropriately – closer for faster broiling, further for slower results. Always use broil-safe cookware, and monitor food closely to prevent burning, given the oven’s reported performance inconsistencies.
Ensure the oven door remains slightly ajar during broiling, as indicated in the full manual. For best results, use a low-sided broiler pan to allow fat and grease to drip away. Remember to adjust cooking times based on food thickness and desired level of browning.
Self-Cleaning Mode (Upper Oven)
The Maytag Gemini’s upper oven features a self-cleaning cycle, designed for convenient maintenance. Before initiating, remove all racks, cookware, and any loose debris. Ensure the oven door can fully lock; do not attempt to force it open during operation.
The cycle utilizes high temperatures, potentially producing odors – adequate ventilation is recommended. Due to reported inconsistencies with the model, closely monitor the cycle’s progress. Following completion, allow the oven to cool completely before wiping away any remaining ash residue. Refer to the full manual for detailed safety precautions.
Using the Lower Oven
The lower oven of the Maytag Gemini offers expanded cooking capabilities, including convection baking and roasting for even heat distribution. Utilize convection settings for optimal results when preparing multiple dishes simultaneously. This oven also features dedicated proofing and warming functions, ideal for dough rising or keeping foods at serving temperature.
Remember that, as with the upper oven, the MET8720DS model has shown inconsistent performance. Experiment with temperature settings and cooking times to achieve desired results. Always consult recipe guidelines and adjust accordingly, monitoring food closely during the cooking process.
Convection Baking & Roasting
The lower oven’s convection feature circulates hot air for faster, more even cooking. This is particularly beneficial when roasting meats or baking multiple trays of cookies simultaneously. For optimal convection baking, reduce recipe temperature by 25°F and check for doneness earlier than the suggested time.
However, be aware that the Maytag Gemini MET8720DS has demonstrated inconsistent performance. Monitor food closely, as convection may not always deliver uniform results. Experiment with rack positions and adjust cooking times to compensate for potential variations in heat distribution within the oven.
Proofing & Warming Functions
The lower oven offers dedicated proofing and warming settings, ideal for yeast doughs and keeping cooked foods at serving temperature. The proofing function provides a consistently warm, humid environment, accelerating yeast activity for lighter, fluffier baked goods. The warming function maintains food between 140°F and 170°F.
Given the reported inconsistencies of the Maytag Gemini MET8720DS, closely monitor temperatures during proofing. While the warming function is convenient, avoid prolonged use as it may affect food quality. Regularly check food to ensure it remains at a safe and palatable temperature.
Self-Cleaning Mode (Lower Oven)
The lower oven features a self-cleaning cycle, utilizing high temperatures to burn off food residue. Before initiating, remove all racks, cookware, and any loose debris. Select the desired cleaning cycle length – light, medium, or heavy – based on soil level. The door automatically locks during operation for safety.
Considering the MET8720DS’s reported performance issues, monitor the self-clean cycle closely. Ensure adequate ventilation, as the process generates fumes. Following completion, allow the oven to cool completely before unlocking the door and wiping away any remaining ash.
Special Features & Settings
The Maytag Gemini offers several convenient features beyond basic baking and roasting. Utilize the Delay Start function to program cooking to begin at a later time, perfect for meal preparation. A built-in Timer allows for precise cooking duration tracking. For specific recipes, explore the Temperature Probe, ensuring food reaches desired internal temperatures.
Furthermore, the MET8720DS includes a Sabbath Mode, adhering to specific dietary and observance practices. While reviews note limited advanced features, these settings enhance usability and cater to diverse user needs.
Delay Start & Timer Functions
The Maytag Gemini’s Delay Start feature allows convenient programming of cooking initiation. Simply set the desired start time, and the oven will automatically begin operation – ideal for preheating or timed meals. The Timer function operates independently, enabling users to set a duration for cooking without affecting the start time.
Both functions are controlled through the electronic touch controls. Ensure accurate time setting for optimal results. Utilizing these features streamlines meal preparation, offering flexibility and convenience for busy schedules. Refer to the control panel overview for detailed instructions.
Temperature Probe Usage
The Maytag Gemini double oven supports a temperature probe for precise cooking, particularly beneficial for roasts and larger cuts of meat. Insert the probe into the thickest part of the food, ensuring it doesn’t touch bone. Select the desired final internal temperature via the control panel.
The oven will automatically shut off when the set temperature is reached, preventing overcooking. Regularly check the probe for cleanliness and proper function. Proper probe placement is crucial for accurate temperature readings and consistently perfect results. Refer to the oven’s display for real-time temperature updates.
Sabbath Mode Operation
The Maytag Gemini offers a Sabbath Mode, designed to comply with Jewish dietary laws by disabling certain oven functions on the Sabbath or religious holidays. To activate, press and hold the ‘Sabbath Mode’ button (if equipped) for a specified duration – consult your model’s specific instructions.
In Sabbath Mode, the oven will maintain a consistent temperature without automatic shut-off or display updates. The oven light will also remain off. To deactivate, repeat the activation process. Always ensure you understand the specific settings and limitations of Sabbath Mode before use.
Troubleshooting Common Issues
Experiencing problems with your Maytag Gemini? This section addresses frequent concerns. Inconsistent performance, as noted in reviews, can sometimes be resolved by ensuring proper ventilation and avoiding overloading the ovens. If the oven isn’t heating, check the power supply and ensure the control panel isn’t locked.
Control panel malfunctions may require a reset – consult the ‘Oven Control Panel Overview’ section. Self-clean cycle issues often stem from excessive debris; ensure the oven is thoroughly cleared beforehand. For persistent problems, contact Maytag customer support.
Oven Not Heating
If your Maytag Gemini isn’t heating, first verify the power cord is securely plugged into a functioning outlet. Check your home’s circuit breaker or fuse box to ensure the oven’s circuit hasn’t tripped. Confirm the control panel isn’t in a locked state, preventing operation.
Ensure the correct baking or broiling function is selected, and the temperature is appropriately set. Inconsistent performance, a noted issue with this model, might require multiple attempts. If the problem persists, avoid self-diagnosis and contact a qualified technician for assistance.
Control Panel Malfunctions
Experiencing issues with the Maytag Gemini’s control panel? First, try resetting the oven by unplugging it for five minutes, then plugging it back in. If the touch controls are unresponsive, ensure your hands are clean and dry. A common complaint regarding this model involves inconsistent performance, potentially causing erratic panel behavior.
If the display is blank or showing errors, consult the troubleshooting section for specific error codes. Avoid attempting complex repairs yourself; contact a certified technician to diagnose and resolve any underlying electrical or software problems.
Self-Clean Cycle Problems
Encountering issues with the self-clean cycle on your Maytag Gemini? Ensure the oven door is completely locked before initiating the cycle. If the cycle fails to start, verify the control panel isn’t displaying an error code – consult the troubleshooting guide for definitions. A common issue reported with this model is incomplete cleaning due to inconsistent heating.
If smoke appears during the cycle, immediately stop it and ventilate the kitchen. Never manually open the door during operation. For persistent problems, contact a qualified technician, as internal component failures may require professional attention.
Care & Maintenance
Maintaining your Maytag Gemini double oven ensures longevity and optimal performance. Regularly clean the interior after each use to prevent baked-on residue, utilizing a mild detergent and soft cloth. Avoid abrasive cleaners which can damage the surfaces. The exterior should be wiped down with a damp cloth and stainless steel cleaner, if applicable.
Periodically inspect and replace oven lights as needed for clear visibility. Following self-clean cycles, allow the oven to cool completely before wiping away any remaining ash. Proper care will mitigate issues related to inconsistent heating reported with this model.
Cleaning the Oven Interior
Regular interior cleaning is crucial for maintaining your Maytag Gemini oven’s performance. After each use, wipe down spills immediately with a damp, soapy cloth. For baked-on residue, create a paste of baking soda and water, apply, and let sit before scrubbing gently.
Avoid abrasive cleaners or scouring pads, as these can damage the oven’s interior surfaces. Following a self-clean cycle, ensure the oven is completely cool before wiping away any residual ash. Consistent cleaning helps prevent issues with inconsistent heating, a noted concern for this model.
Cleaning the Oven Exterior
Maintaining a clean exterior enhances the appearance and longevity of your Maytag Gemini double oven. Regularly wipe down the stainless steel surfaces with a stainless steel cleaner to prevent fingerprints and smudges. For control panels, use a soft, damp cloth – avoid harsh chemicals that could damage the electronic touch controls.
Pay attention to the area around the oven door, as grease and food splatters can accumulate. A mild dish soap solution works effectively for these areas. Consistent exterior cleaning contributes to the overall upkeep of the appliance, addressing potential issues related to its performance.
Replacing Oven Lights
If an oven light burns out in your Maytag Gemini, replacement is a straightforward process. Always disconnect power to the oven at the breaker box before attempting any repairs! Locate the light fixture, typically at the back of the oven cavity. Remove the protective cover – often held in place by screws.

Carefully unscrew the old bulb and replace it with a bulb of the correct wattage (refer to your model’s specifications). Reattach the cover and restore power. A functioning oven light ensures optimal visibility during cooking, contributing to a better user experience and addressing potential safety concerns.